A loc bun that looks great when you leave the house and falls apart before lunch is not a styling failure. It is a technique problem.
You have probably tried everything. A tight elastic. A looser elastic. More bobby pins. Different bobby pins. And yet by midmorning the bun is listing to one side, locs are poking out at odd angles, and you are fixing it in the bathroom mirror at work. Again.
Here is the truth: loc buns behave completely differently from buns made with loose hair. They are heavier. Their surface is smoother. They resist the tools that work perfectly fine on regular hair. Most tutorials online were not written for locs. So the techniques fail.
This guide gives you a loc-specific method. You will learn exactly why your bun keeps falling out, what tools to have ready, and a 10-step approach that creates a loc bun that stays up all day.
You will also find out which products genuinely help, how to protect your hairline while doing this, and how to refresh the style on day two without starting over.
Loc Bun Structural Integrity Simulator
Architect an all-day hold using the advanced two-section wrap, layered anchoring, and the physics of the X-pattern pin configuration.
Select Bun Base Positioning
Bun placement dictates how gravity affects structural longevity throughout the day.
Primary Base Foundation
The number of structural loops around your primary ponytail gather determines base drift.
Bundle Separation & Counterbalance Wrap
How do you distribute the primary length mass around your base foundation?
Bilateral Pinning Vector Configuration
The insertion pattern of structural bobby pins defines the multi-directional load capacity.
Outer Containment Ring & Alignment
Final defensive layers and weight balance monitoring before locking the build down.
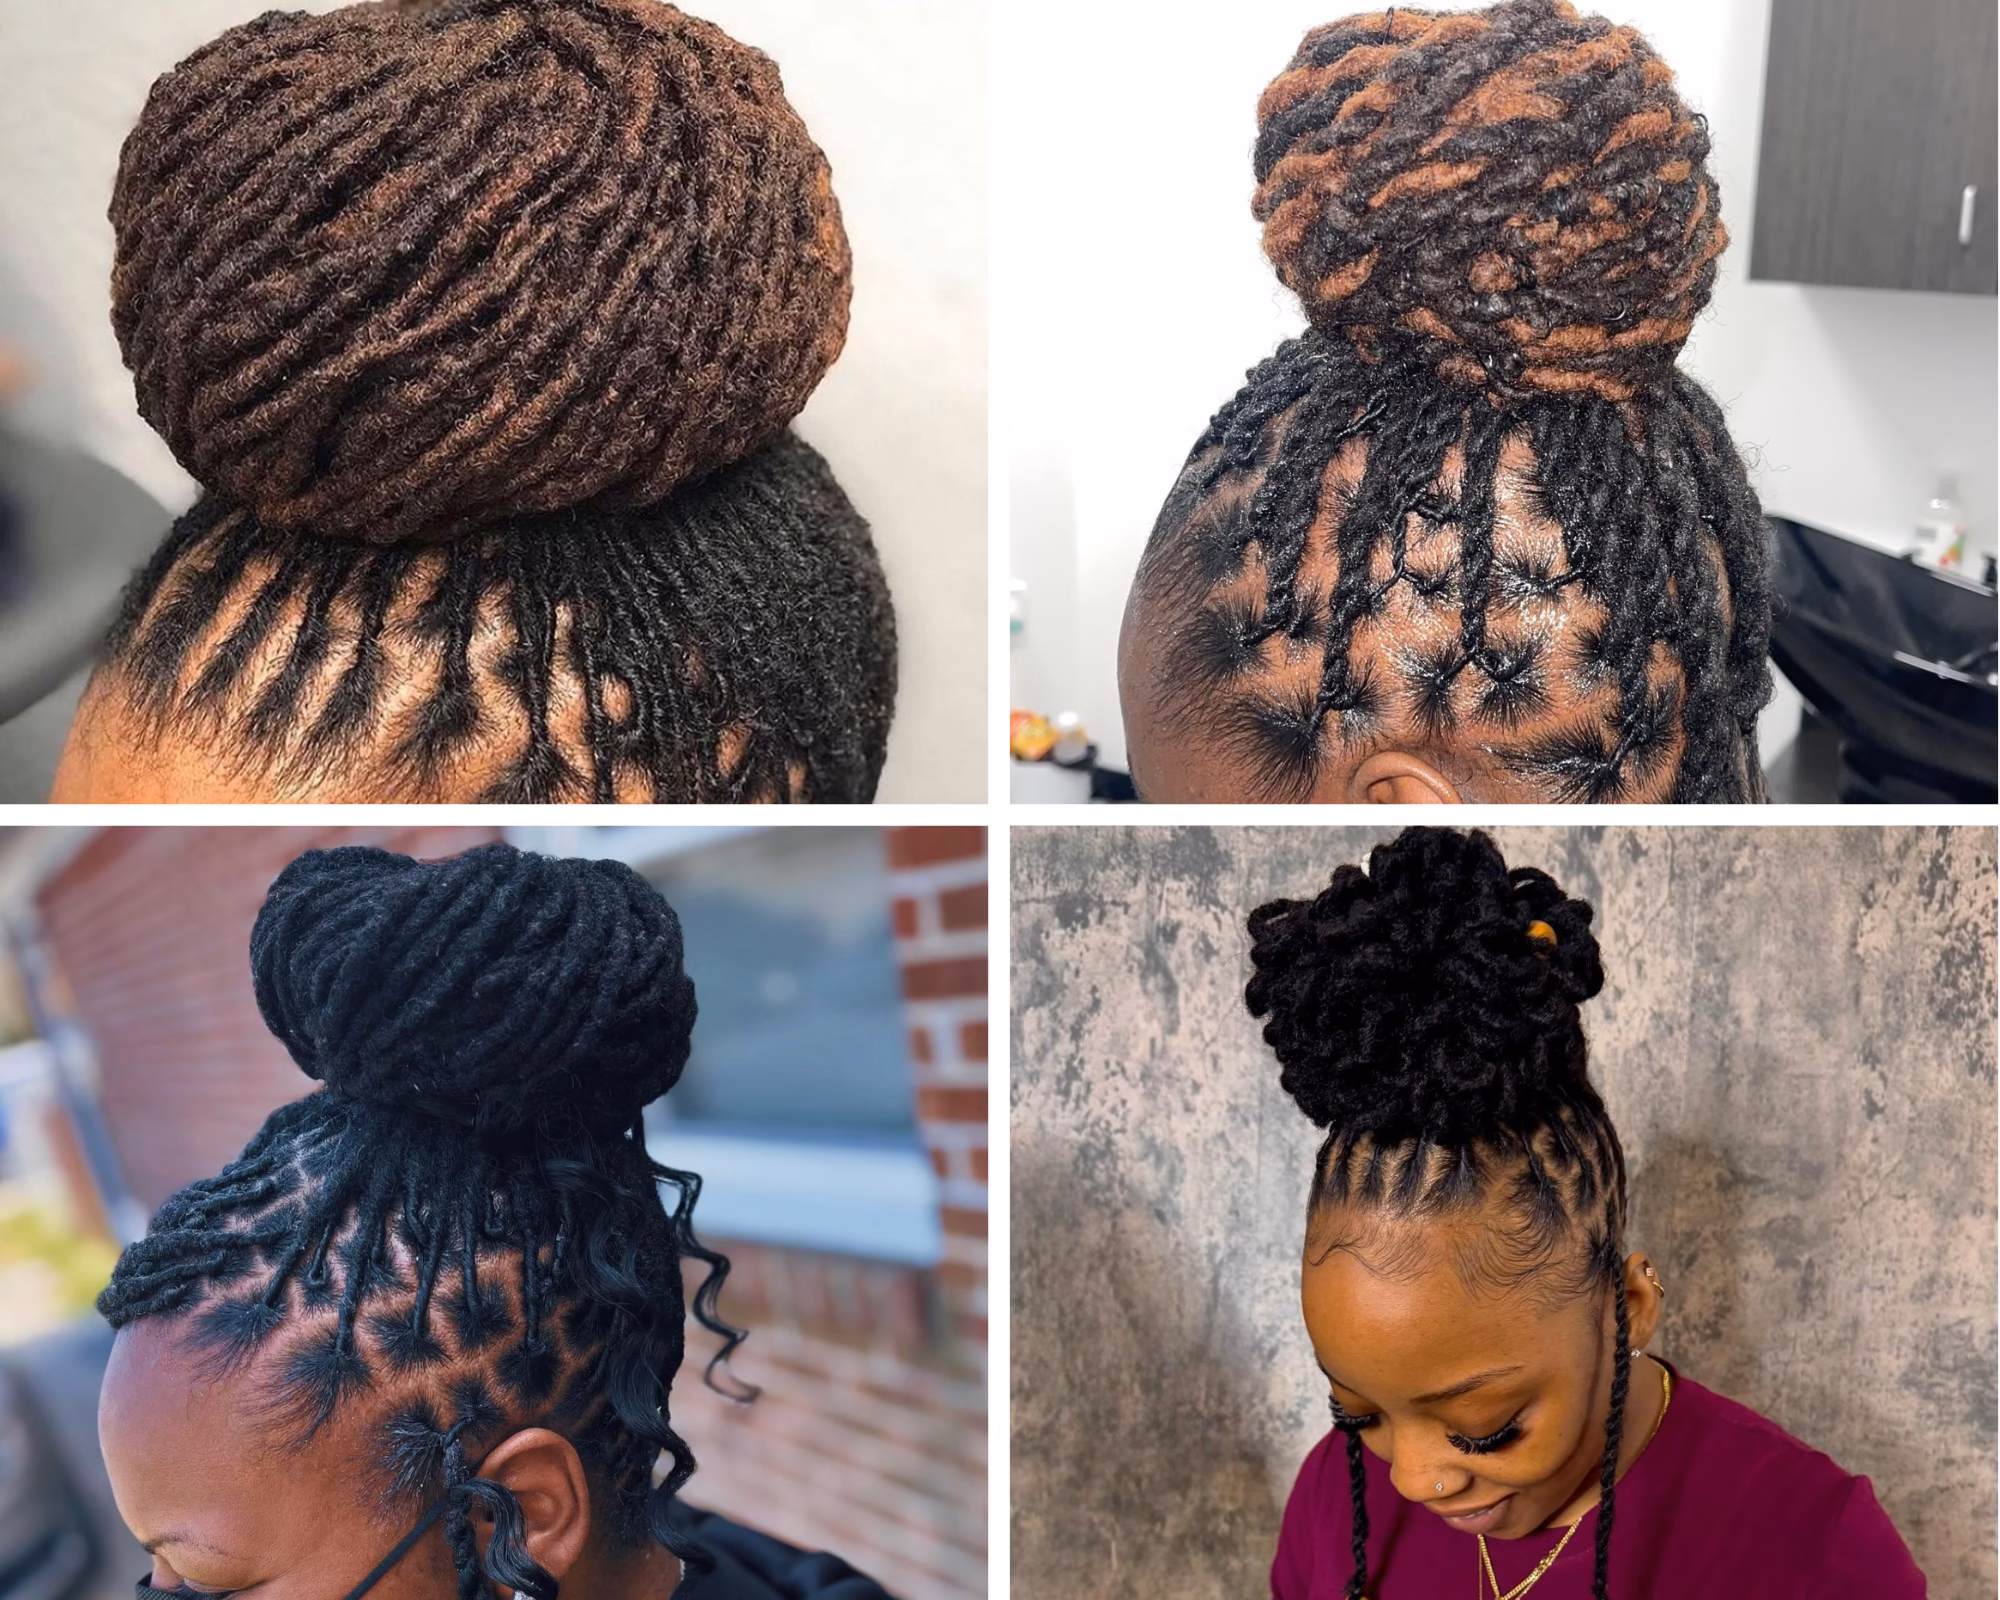
Why Your Loc Bun Keeps Falling Out (It Is Not Your Locs)
You did everything right. The bun looked great when you left. By 11am, three locs were poking out and the whole thing was listing to the left.
Here is what is actually happening.
Weight is the biggest reason. Locs are significantly heavier than loose hair. A full head of long, mature locs styled into a bun creates a dense, heavy mass that puts constant downward pressure on the elastic holding it. A standard thin elastic band was never designed to hold that kind of sustained weight for eight or more hours.
Daixidreadology’s April 2026 guide on loc weight and posture confirms this directly: a heavy bun stacked on the crown shifts your center of gravity and creates ongoing tension throughout the day.
Loc texture resists gripping tools. Well-moisturized, mature locs have a smooth surface. Bobby pins that anchor loose hair slide straight out of that surface. Standard elastics slip over locs instead of gripping them. The tools are not failing because you used them wrong. They were not built for this specific texture.
The wrong tie for the weight involved. Thin elastics snap under thick locs or slide out entirely. The loc community has known this for years. Hair.com’s faux locs guide confirms that women with very thick locs sometimes use a flat shoelace instead of a standard elastic because a regular band simply cannot handle the volume and weight. That is not a workaround. That is the correct tool for the job.
Too much product on the locs before styling. Heavy butters, thick oils, and creamy leave-ins applied before you start make loc surfaces slippery. The elastic has nothing to grip. Dr Locs’ 2025 breakage prevention guide confirms that product buildup weakens locs over time and makes them significantly harder to hold in any style.
Recommended post Short Locs Styles for the Holidays: 10 Festive Looks for the Season
Single-point anchoring. One tie and done. That is how most people finish. On heavy locs, one anchor point is never enough. The bun needs layered anchoring: a base tie, a two-section wrap, and secondary bobby pins. None of this is complicated. But all of it is necessary.
None of this is your fault. And all of it has a direct fix. The next sections cover each one.
What You Need Before You Touch Your Locs
The single most important thing on this list is not what you think. It is the bobby pins. Specifically, the size of the bobby pins you are using.
Mini bobby pins are made for fine hair. On locs, they slide out before you finish placing them. You need heavy-duty jumbo bobby pins, the longer and wider version that has actual surface area to grip. Get at least 8 to 10 before you start.
Here is the full tools list:
- Large spiral hair ties (also called coil ties) or a thick loc-friendly elastic band. Not thin standard elastics. These snap under the weight or slide out.
- 8 to 10 heavy-duty jumbo bobby pins
- 1 thinner elastic band to use as an outer containment layer at the end
- A lightweight water-based mist spray
- Water-based loc gel (optional but helpful at the base)
- A hair donut or bun maker (optional, adds shape and volume)
If you have extra-thick locs and you have already broken multiple elastics: you are not alone. Hair.com’s faux locs guide and the Lemon8 loc community both confirm that a clean, flat shoelace tied around the ponytail base is a real and reliable alternative. The shoelace distributes the holding load more evenly across a wider surface. It does not snap.
On wet vs dry locs: Style on fully dry locs or lightly misted locs only. Freshly washed locs that are still wet are significantly heavier than dry locs. A bun made on wet locs will sag and loosen as they dry and shift shape throughout the day.
What to avoid using:
- Rubber bands (they create friction and cause breakage at the loc root over time, confirmed by Dr Locs in their December 2024 guide)
- Thin stretched elastics that have lost their grip
- Heavy butters or oils applied directly to the ponytail area before styling
Get all of these tools together before you start. Having to search for a bobby pin mid-style is exactly how buns get rushed and fall apart.
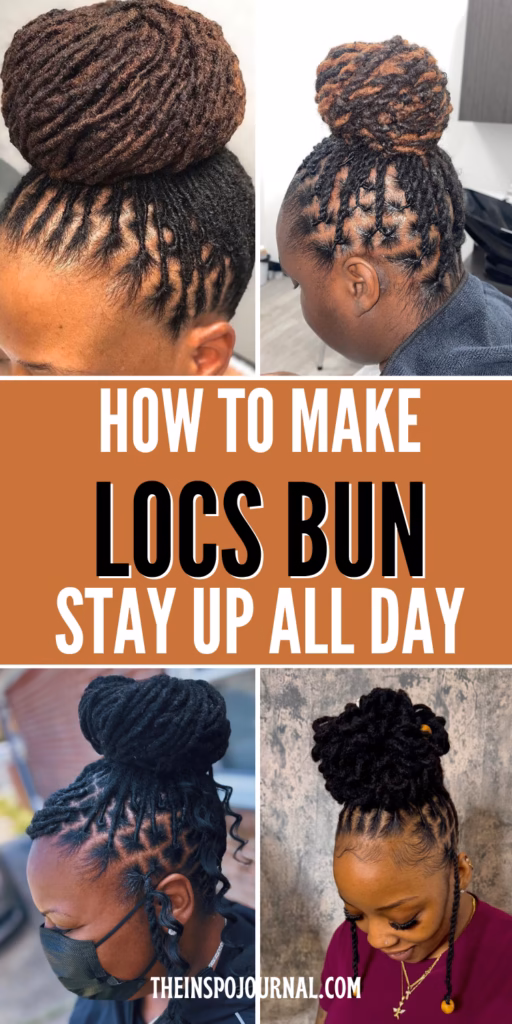
Step-by-Step: The Loc Bun That Stays Up All Day
This method has two features most loc bun tutorials miss: the two-section wrap, and layered anchoring. Both of these are what make the difference between a bun that lasts three hours and one that lasts all day.
Follow each step in order.
Step 1: Lightly mist the locs. Spray the entire head with a water-based mist or plain rose water. Wait 30 to 60 seconds. Your locs should feel slightly soft and cooperative, not wet and heavy.
Step 2: Choose your bun position. High bun at the crown or low bun at the nape. For the high bun, gravity works against you all day and the anchoring needs to be stronger. For the low bun, gravity works in your favor and the bun holds more easily with fewer pins. Hold all locs together with one hand before you do anything else.
Save for later 25 Cute Short Locs Hairstyles That Prove Short Is Always Stunning
Step 3: Tie the base with a thick elastic or shoelace. If using a spiral tie or thick elastic, loop it around the gathered locs three to four times. Not once. Not twice. Three to four times, pulling firm but not painful. If you are using the shoelace method, tie it twice in a flat knot and tuck the ends underneath.
Step 4: Divide the ponytail into two equal sections. This is the step most people skip and it is the most important one after the base tie. Split the ponytail bundle into two roughly equal halves. This sets up the wrap that creates a dense, stable bun shape from the inside.
Step 5: Wrap both sections in opposite directions. Take one half and wrap it clockwise around the elastic base. Take the second half and wrap it counterclockwise. When they meet at the back of the bun, cross them over each other once. This counterbalanced wrapping creates internal tension that holds the bun shape without relying entirely on the pins. One section supports the other.
Step 6: Tuck the ends deep underneath the bun. Push the ends of both sections under the bun and tuck them as far in as possible. This is what stops the bun from unraveling at the tips. The deeper the tuck, the longer it holds.
Step 7: Pin with heavy-duty bobby pins in the X pattern. Insert bobby pins at the base of the bun. Cross two pins in an X shape at each anchor point so they lock against each other. Use at least four X-crosses, placed evenly around the bun. The Smytten bun guide (February 2026) and multiple Lemon8 community posts confirm this: crossing pins at different angles creates a much more secure hold than four pins pointing in the same direction. The X pattern distributes the holding load across two directions instead of one.
Step 8: Wrap the second elastic around the finished bun. Take your thinner elastic and wrap it around the completed bun itself, not around the ponytail base. This is the outer containment layer. It catches stray locs and adds a second ring of resistance that prevents the bun from loosening as you move through the day.
Step 9: Check for comfort, not just security. If anything feels tight or painful at the temples or hairline, loosen the base tie now before you leave. According to NCBI’s StatPearls (medically reviewed May 2025) on traction alopecia, early signs of damage include tenderness and thinning at the hairline. Both are preventable by keeping the bun at a tension that feels secure but comfortable. A bun that hurts is too tight.
Step 10: Check for balance. Step back from the mirror. Look from the front and then from the side. The bun should sit centered and level. An imbalanced bun that leans or sits lopsided will unravel faster because the weight is pulling unevenly against the anchor points.
Loc Bun Structural Integrity Simulator
Architect an all-day hold using the advanced two-section wrap, layered anchoring, and the physics of the X-pattern pin configuration.
Select Bun Base Positioning
Bun placement dictates how gravity affects structural longevity throughout the day.
Primary Base Foundation
The number of structural loops around your primary ponytail gather determines base drift.
Bundle Separation & Counterbalance Wrap
How do you distribute the primary length mass around your base foundation?
Bilateral Pinning Vector Configuration
The insertion pattern of structural bobby pins defines the multi-directional load capacity.
Outer Containment Ring & Alignment
Final defensive layers and weight balance monitoring before locking the build down.
High Bun vs Low Bun: Which One Actually Lasts Longer?
If you want the bun to last longer with less effort, go low. If you want the height, you can still have it. You just need to anchor it more aggressively.
Read also Locs Styles for Black Women This Fall: 14 Cozy and Chic Looks for the Season
Here is the physics.
A high bun at the crown fights gravity all day. The full weight of your locs is constantly pulling downward and away from the anchor point at the top of your head.
Daixidreadology’s April 2026 guide on loc weight and posture confirms that a high, dense bun on the crown creates the most biomechanical load of any bun position and requires the most anchoring effort to hold.
A low bun at the nape works with gravity instead of against it. The bun sits at the lowest natural point on the head. The locs are not fighting to pull away from the anchor.
Low buns typically hold longer with fewer pins. Healthline’s traction alopecia guide also recommends low, loose buns as the safest option for anyone managing tension at the scalp and hairline.
The mid bun, sitting at the back of the head between the crown and the nape, is a reliable middle ground. The anchor point sits against the natural curve of the skull, which provides some structural support. It looks more polished than a low bun and holds more easily than a high one.
For active days: Always choose the low or mid bun when you know you will be moving around a lot, working out, or running between places. A high crown bun on a very active day will need to be re-pinned at least once.
A practical rule for high buns: for every inch higher the bun sits above the nape, add one extra X-pin cross at the base. That is the adjustment that keeps high loc buns stable through a full day.
The Products That Actually Help Your Loc Bun Stay Secure
Most products marketed for locs are designed for retwisting, not for holding a bun in place. The ones that work for bun hold share the same two qualities: water-based and lightweight.
Firm-hold loc gel at the base: A small amount of firm-hold, water-based loc gel applied to the ponytail base before tying adds grip to the loc surface and helps the elastic catch instead of slide.
LionLocs’ review of the best loc gels (2023, still current) identifies the key qualities: lightweight formula with strong hold and no residue.
Two options they confirm: EdgeBooster, which provides strong hold without flaking, and Made For Locs Firm Hold Gel, which holds in humid conditions and is formulated specifically to avoid buildup.
Taliah Waajid Honey Hold It Loc Gel is another strong option. It is water-based, formulated with honey for hydration and hibiscus for strength, leaves no buildup, and is available at naturalhair.org. This is a brand that has been working with locs for decades.
The water-first rule: Keisha Charmaine of Love, Light & Locs, who has been on her loc for 15 years, is direct about this: if the first ingredient listed is not water or a water-soluble ingredient, the product will likely cause buildup inside your locs over time.
Buildup leads to stiffness, added weight, and a paradoxically slippery surface that makes your elastic slide faster.
You may enjoy reading Office-Ready Locs Hairstyles for Women: 12 Professional Styles to Try
What not to use at the bun base:
- Heavy butters or coconut oil applied directly to the ponytail area before styling
- Hairspray, which stiffens locs and makes them brittle over time
- Rubber bands or old stretched-out elastics (Dr Locs, December 2024: these create friction and cause thinning and breakage at the loc root)
The edge control finish: This is the last thing you apply. A small amount of water-based edge control around the hairline only, smoothed down with a soft brush or your fingertip. It keeps the area around the bun looking polished without adding weight or additional tension to the bun itself.
How to Protect Your Hairline While Wearing a Loc Bun
Traction alopecia, hair loss from repeated pulling, is a documented medical condition. It is listed in NCBI’s clinical database and was updated as recently as May 2025. Buns, dreadlocks, and ponytails are specifically named as contributing hairstyles.
This is not a reason to stop wearing loc buns. It is a reason to wear them the right way.
According to NCBI StatPearls (May 2025), traction alopecia predominantly affects women of African descent who wear hairstyles that include tight braids, dreadlocks, and updos. Early signs appear along the hairline: small bumps, hair breakage, and thinning in the temporal and frontal areas.
The good news is that early-stage traction alopecia is reversible. Chronic cases, where the pulling continues untreated for too long, can lead to permanent scarring of the follicles.
The pain rule: If the bun hurts, it is too tight. This is not open to interpretation. Luxe Hair Transplant Center (June 2025) confirms that a tight bun worn consistently can directly cause hairline recession. Healthline agrees. NCBI agrees.
Every clinical source in this research agrees. If your bun causes a headache or scalp soreness, loosen it before you go anywhere.
Rotate the position: AROMASE’s July 2025 traction alopecia guide and Naturalimageskincenter.com both confirm the same thing: wearing your bun in the exact same spot every day means the same follicles bear the same tension every day.
Shifting the position even slightly, from dead center to slightly left or right, changes which follicles carry the load. Small rotations add up to significantly less cumulative stress over time.
Give your hairline rest days: Jaycee Naturals (December 2025) recommends loose braided updos that spread tension across more points rather than pulling from a single concentrated location. Dr Locs (December 2024) makes the same recommendation. Your hairline needs days where nothing is pulling it.
Read more Short Bob Locs Styles: 15 Chic Looks for Women Who Love Bold Hair
Warning signs to watch for:
- Small bumps or pimple-like spots along the hairline
- Redness or persistent soreness that does not go away when the bun comes down
- Thinning hair at the temples or forehead
- Shiny, smooth skin where hair used to be
If you notice any of these, loosen your styles immediately and book an appointment with a dermatologist. You do not have to stop wearing loc buns. You just need to move them around, keep them loose enough to feel comfortable, and give your scalp rest between styling days.
How to Fix Your Bun on Day 2 and Day 3 Without Starting Over
The step-by-step method from the section above is for day one. Day two and day three have a much shorter version.
Do not take the whole bun down. This is the most common mistake. If the bun has loosened by the next morning, the base elastic is almost certainly still in place and doing its job. The problem is the outer layer. Remove only the outer elastic and the bobby pins.
Re-tuck any locs that have escaped. Re-cross the two sections if they have shifted. Re-pin with the X pattern. Wrap the outer elastic back around. The whole process takes under three minutes.
Mist lightly to revive. A quick spray of rose water or plain water on the surface of the bun softens the locs just enough to reshape and smooth the bun without adding significant weight. This is enough after sleeping in a satin bonnet.
Night protection is what makes day two possible. Sleep with a satin bonnet every night the bun is in. The Sisterlocked.com bedtime loc routine confirms cotton pillowcases are one of the biggest contributors to friction and dryness in locs.
Satin protects the bun’s shape while you sleep, which means the morning refresh is minimal rather than a full redo.
What ruins a day two bun:
- Sleeping without any head covering
- Spraying too much water directly into the styled bun
- Applying heavy product to locs that are already styled and sitting in a bun
Day three is your reset day. By the third day, the base elastic has usually loosened enough that starting fresh is worth the effort. Take the bun all the way down. Moisturize your scalp. Let your locs hang loose for a few hours before restyling.
That break matters. Your scalp needs the pressure relief, and your locs will be easier to work with after some time down.
You Now Have Everything You Need
Loc buns fall out because of weight, smooth loc texture, the wrong tie, and single-point anchoring. None of that is a problem with your locs. All of it is fixable with the right method.
The two-section wrap with X-pattern bobby pins and a layered outer elastic creates a bun that holds through a full day. Low buns work with gravity and need fewer pins.
High buns fight gravity and need more anchoring for every inch of height. Water-based firm-hold loc gel adds grip at the base. Wax and heavy butters make everything worse.
Your hairline matters. If the bun causes pain, it is too tight. Rotate the position across days and weeks so the same follicles are not taking the same load every day.
Try the two-section wrap method this week with one bun. Check the mirror at the end of the day. If the bun held, you have found your method. If it slipped slightly, add one more X-pin cross at the base and try again tomorrow.
A loc bun that stays up all day is not about more product or tighter bands. It is about using the right technique for the way locs actually behave. Once you understand that, the method becomes easy and the result becomes reliable.